Issuer
Learn how to implement the issuance of verifiable credentials from a server to a holder app using the Multipaz SDK in a secure and standards-compliant way, following the OpenID4VCI protocol. OpenID4VCI stands for OpenID Connect for Verifiable Credential Issuance, which defines an OAuth-protected API for the issuance of Verifiable Credentials.
What you’ll implement:
- OpenID4VCI credential offer handling (via app links, or custom URL schemes).
- Minimal “wallet back-end” for demo purposes to complete attestation and OAuth steps.
- A basic UI that guides users through authorization and receives issued credentials.
Create the feature/provisioning module
To create a new module: File → New → New Module → Kotlin Multiplatform Shared Module. Name it as shown in the table above and configure the package name (e.g., org.multipaz.getstarted.provisioning for feature:provisioning).
Update the build.gradle.kts file for the module:
// feature/provisioning/build.gradle.kts
plugins {
    alias(libs.plugins.composeMultiplatform)
    alias(libs.plugins.composeCompiler)
    alias(libs.plugins.kotlinSerialization)
}
kotlin {
    jvmToolchain(17)

    androidLibrary {
        @OptIn(ExperimentalKotlinGradlePluginApi::class)
        compilerOptions {
            jvmTarget.set(JvmTarget.JVM_17)
        }
    }

    sourceSets {
       commonMain.dependencies {
            implementation(project(":core"))

            implementation(libs.multipaz)
            implementation(libs.multipaz.compose)
       }
   }
}
Refer to this provisioning build.gradle.kts code for the complete example.
Also add the dependency in composeApp/build.gradle.kts:
// composeApp/build.gradle.kts
kotlin {
    sourceSets {
        commonMain.dependencies {
            // ... other dependencies
            implementation(project(":feature:provisioning"))
        }
    }
}
Refer to this composeApp build.gradle.kts code for the complete example.
Dependencies
Add Ktor HTTP client for network calls (core + platform engines). Please note that we are adding these dependencies to the :core module.
Update libs.versions.toml:
[versions]
ktor = "3.4.0"
kotlinxSerializationJson = "1.9.0"

[libraries]
ktor-client-core = { module = "io.ktor:ktor-client-core", version.ref = "ktor" }
ktor-client-java = { module = "io.ktor:ktor-client-java", version.ref = "ktor" }
ktor-client-cio = { module = "io.ktor:ktor-client-cio", version.ref = "ktor" }
ktor-client-android = { module = "io.ktor:ktor-client-android", version.ref = "ktor" }
ktor-client-darwin = { module = "io.ktor:ktor-client-darwin", version.ref = "ktor" }

kotlinx-serialization-json = { module = "org.jetbrains.kotlinx:kotlinx-serialization-json", version.ref = "kotlinxSerializationJson" }
Refer to this libs.versions.toml code for the complete example.
Update core/build.gradle.kts:
kotlin {
    sourceSets {

        androidMain.dependencies {
            // ...
            implementation(libs.ktor.client.android)
        }

        commonMain.dependencies {
            // ...
            implementation(libs.ktor.client.core)
            // CIO for JVM/Android
            implementation(libs.ktor.client.cio)
            implementation(libs.kotlinx.serialization.json)
        }

        iosMain.dependencies {
            // Darwin engine for iOS in iosMain
            implementation(libs.ktor.client.darwin)
        }

    }
}
Refer to this build.gradle.kts code for the complete example.
iOS Setup
Step 1: Configure the Info.plist file
The iOS app requires URL scheme configuration in Info.plist to handle deep links and custom URL schemes. Info.plist (Information Property List) is a configuration file that contains metadata about your iOS app, including supported URL schemes, app permissions, and other settings.
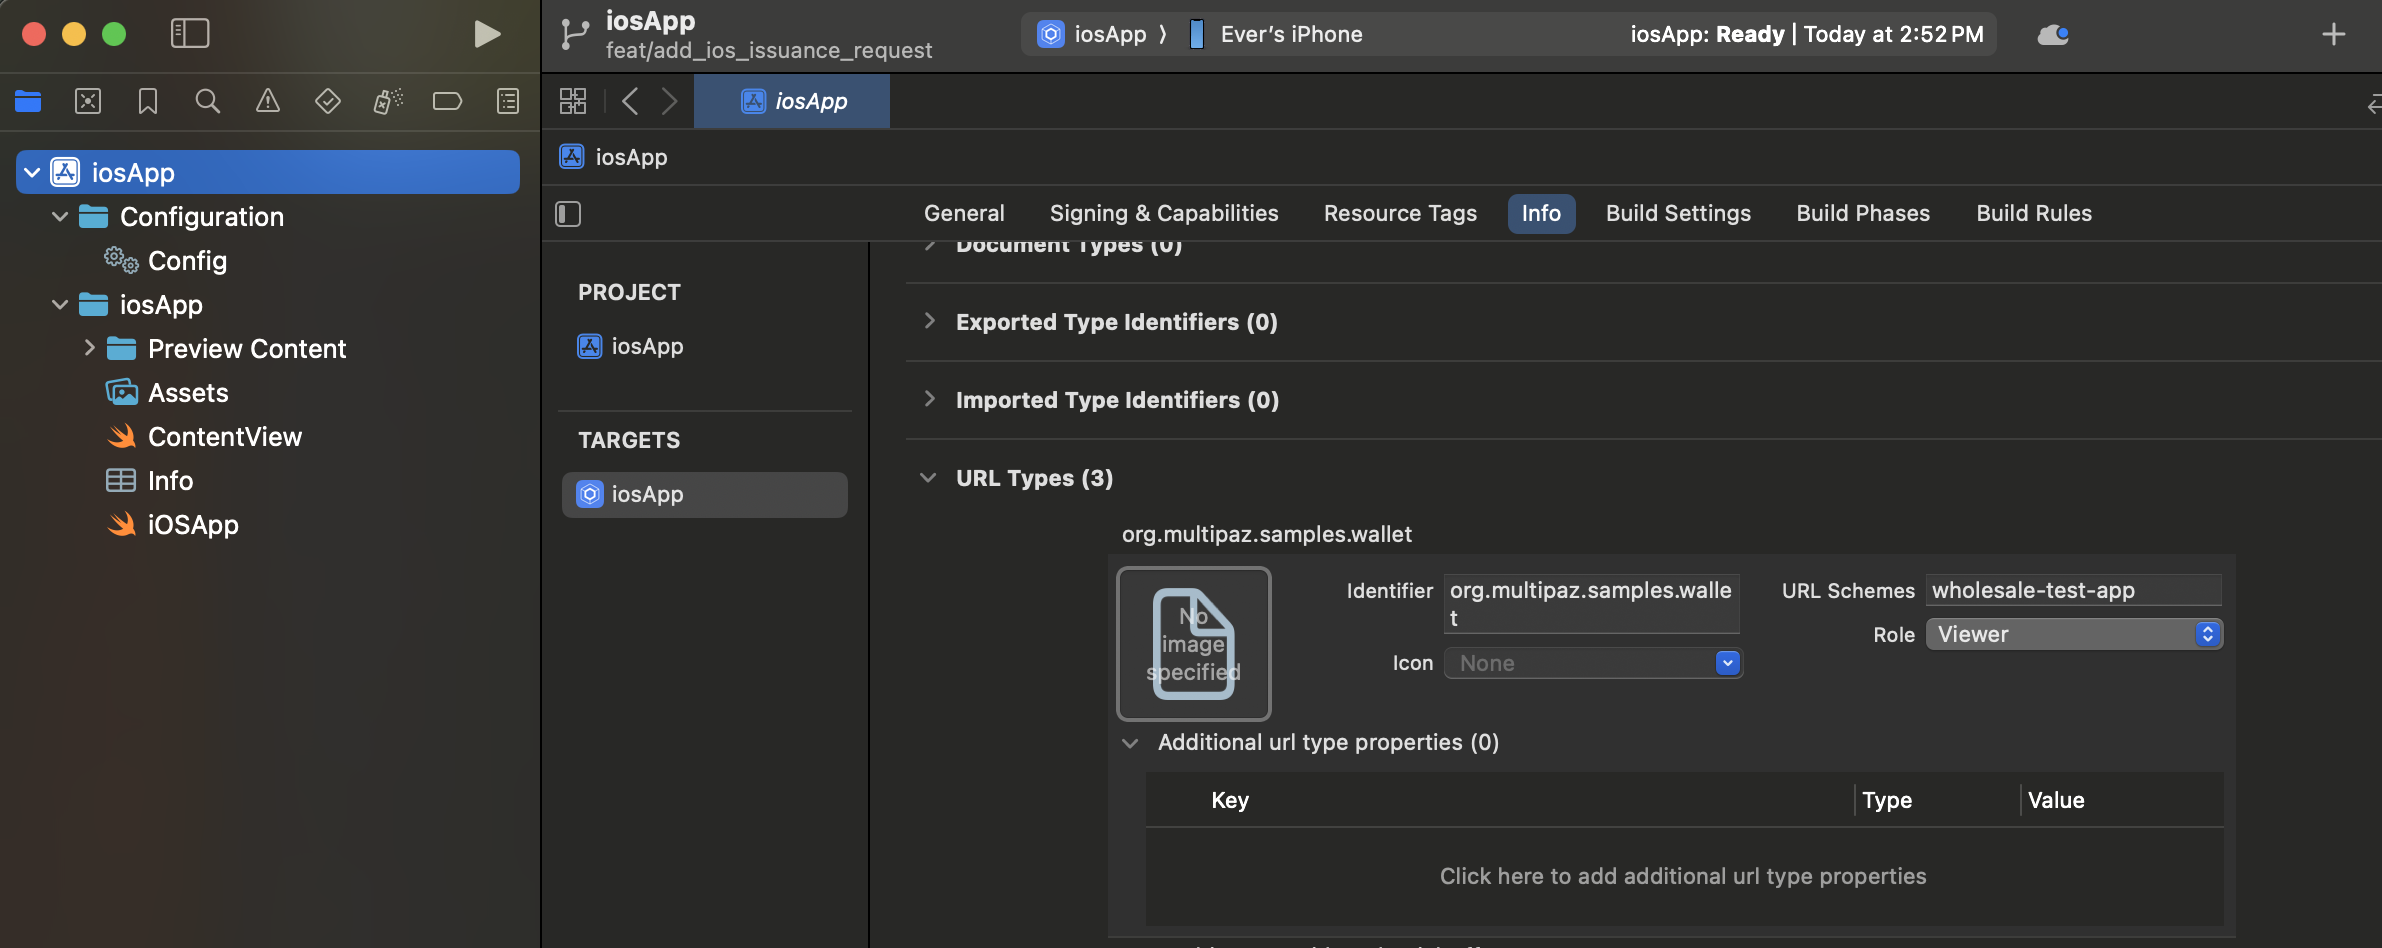
Configuring URL Types in Xcode:
You can configure URL schemes directly in Xcode using the Info tab:
- Open your iOS app target in Xcode
- Select the Info tab in the project settings
- Expand the URL Types section
- Click the + button to add a new URL Type
- Configure each URL scheme with:
- Identifier: A reverse DNS identifier (e.g.,
org.multipaz.samples.wallet) - URL Schemes: The custom scheme name (e.g.,
wholesale-test-app) - Role: Typically set to "Viewer" for custom schemes
- Identifier: A reverse DNS identifier (e.g.,
Manual Configuration (Alternative):
If you prefer to edit the XML directly, add the following to your Info.plist file:
<key>CFBundleURLTypes</key>
<array>
    <!-- Custom URL Scheme for OAuth Callbacks -->
    <dict>
        <key>CFBundleTypeRole</key>
        <string>Viewer</string>
        <key>CFBundleURLName</key>
        <string>org.multipaz.samples.wallet</string>
        <key>CFBundleURLSchemes</key>
        <array>
            <string>get-started-app</string>
        </array>
    </dict>

    <!-- OpenID Credential Offer Scheme -->
    <dict>
        <key>CFBundleTypeRole</key>
        <string>Viewer</string>
        <key>CFBundleURLName</key>
        <string>org.multipaz.openid.credential-offer</string>
        <key>CFBundleURLSchemes</key>
        <array>
            <string>openid-credential-offer</string>
        </array>
    </dict>

    <!-- HAIP Scheme -->
    <dict>
        <key>CFBundleTypeRole</key>
        <string>Viewer</string>
        <key>CFBundleURLName</key>
        <string>org.multipaz.openid.haip</string>
        <key>CFBundleURLSchemes</key>
        <array>
            <string>haip</string>
        </array>
    </dict>
</array>
Refer to this Info.plist code for the complete example.
Step 2: Configure ContentView.swift
In ContentView.swift, add the .onOpenURL modifier to handle incoming URLs:
struct ContentView: View {
    var body: some View {
        ComposeView()
            .ignoresSafeArea()
            .onOpenURL(perform: { url in
                MainViewControllerKt.HandleUrl(url: url.absoluteString)
            })
    }
}
Refer to this ContentView.swift code for the complete example.
Step 3: Implement URL Handler in MainViewController.kt
In MainViewController.kt (iOS-specific), implement the HandleUrl function:
private val app = App.getInstance()

fun MainViewController() = ComposeUIViewController {
    app.Content()
}

fun HandleUrl(url: String) {
    app.handleUrl(url)
}
Refer to this MainViewController.kt code for the complete example.
Step 4: Build and Run iOS App
To test the iOS implementation, you can follow these iOS build instructions from our Face Detection & Verification guide.
Android: Permissions and Custom URI Schemes
Issuance needs internet access and deep link handling for:
- Credential offers (e.g.,
openid-credential-offer://) - Wallet redirect/callback (custom or HTTPS app link)
Update androidMain/AndroidManifest.xml:
<!-- Networking -->
<uses-permission android:name="android.permission.INTERNET" />

<!-- Required on Android 11+ for Multipaz's OAuth flow to discover a Chrome Custom Tabs
     provider via CustomTabsClient.getPackageName() -->
<queries>
    <intent>
        <action android:name="android.support.customtabs.action.CustomTabsService" />
    </intent>
</queries>

<application ...>
    <activity
        android:name=".MainActivity"
        android:enableOnBackInvokedCallback="true"
        android:exported="true"
        android:launchMode="singleInstance">

        <intent-filter>
            <action android:name="android.intent.action.MAIN" />
            <category android:name="android.intent.category.LAUNCHER" />
        </intent-filter>

        <!-- 1) Custom URI scheme for wallet redirect (used in this sample) -->
        <!-- Example redirect: get-started-app://landing/?state=... -->
        <intent-filter>
            <action android:name="android.intent.action.VIEW" />
            <category android:name="android.intent.category.DEFAULT" />
            <category android:name="android.intent.category.BROWSABLE" />
            <data android:scheme="get-started-app" />
            <data android:host="landing" />
        </intent-filter>

        <!-- 2) Credential Offer schemes (OpenID4VCI, HAIP) -->
        <!-- Allows scanning/handling credential offer URLs -->
        <intent-filter>
            <action android:name="android.intent.action.VIEW" />
            <category android:name="android.intent.category.DEFAULT" />
            <category android:name="android.intent.category.BROWSABLE" />
            <data android:scheme="openid-credential-offer" />
            <data android:scheme="haip" />
            <data android:host="*" />
        </intent-filter>

        <!-- Alternative (recommended for production): HTTPS App Links
             Requires .well-known/assetlinks.json on your domain.
             See comments in the patch for details. -->
        <!--
        <intent-filter android:autoVerify="true">
            <action android:name="android.intent.action.VIEW" />
            <category android:name="android.intent.category.DEFAULT" />
            <category android:name="android.intent.category.BROWSABLE" />
            <data
                android:host="getstarted.multipaz.org"
                android:pathPattern="/landing/.*"
                android:scheme="https" />
        </intent-filter>
        -->
    </activity>
</application>
Refer to this AndroidManifest.xml code for the complete example.
Choosing a link strategy
There are two ways to route back to your app after authorization:
- Custom URI scheme (used in this sample)
- Example:
get-started-app://landing/?state=... - Pros: Simple to set up for demos and codelabs; no server config needed.
- Cons: Cannot be initiated by the server; when multiple apps register the same scheme, Android may present a chooser or misroute the intent. This can conflict with scenarios where Test App and Getting Started Sample App are both installed.
- Example:
- HTTPS App Links (preferred for production)
- Pros: Verifiable, secure, server-initiated, avoids intent-misrouting when multiple apps are installed.
- Requirements:
- Host an Digital Asset Links file at
https://<your-domain>/.well-known/assetlinks.jsoncontaining your Android package name and signing cert SHA-256. - Add an Android
VIEWintent filter withandroid:autoVerify="true"for your HTTPS domain and path.
- Host an Digital Asset Links file at
Recommendation: Use custom schemes for development, switch to HTTPS App Links for production.
Deep Link Handling in Activity
Handle incoming URLs (Intents) in MainActivity and forward them to the app logic:
androidMain/MainActivity.kt
class MainActivity : FragmentActivity() {

    override fun onCreate(savedInstanceState: Bundle?) {
        // ...
        setContent { /* ... */ }
        handleIntent(intent)
    }

    override fun onNewIntent(intent: Intent) {
        super.onNewIntent(intent)
        setIntent(intent)
        handleIntent(intent)
    }

    private fun handleIntent(intent: Intent) {
        if (intent.action == Intent.ACTION_VIEW) {
            val url = intent.dataString ?: return
            lifecycle.coroutineScope.launch {
                val app = App.getInstance()
                app.init()
                app.handleUrl(url)
            }
        }
    }
}
Refer to this MainActivity.kt code for the complete example.
Initialize Issuance in App
- Add provisioning fields, initialize ProvisioningModel & ProvisioningSupport.
In the modularized sample, ProvisioningSupport and ProvisioningScreen live in the feature/provisioning module. The App class delegates to AppContainer for shared infrastructure:
// composeApp/src/commonMain/kotlin/.../App.kt
class App {
    private val container = AppContainer.getInstance()
    private val credentialOffers = Channel<String>()

    lateinit var provisioningModel: ProvisioningModel
    lateinit var provisioningSupport: ProvisioningSupport

    suspend fun init() {
        if (isInitialized) return

        container.init()

        provisioningModel = ProvisioningModel(
            documentProvisioningHandler = DocumentProvisioningHandler(
                documentStore = container.documentStore,
                secureArea = container.secureArea
            ),
            httpClient = HttpClient(httpClientEngineFactory) {
                followRedirects = false
            },
            promptModel = AppContainer.promptModel,
            authorizationSecureArea = container.secureArea
        )
        provisioningSupport = ProvisioningSupport(
            storage = container.storage,
            secureArea = container.secureArea,
        )
        provisioningSupport.init()

        isInitialized = true
    }
}
Refer to this initialization code for the complete example.
- Add URL handling for credential offers and app links:
class App {
    companion object {
        private const val OID4VCI_CREDENTIAL_OFFER_URL_SCHEME = "openid-credential-offer://"
        private const val HAIP_URL_SCHEME = "haip://"
        private const val ISSUER_URL = "https://issuer.multipaz.org/"
        // ...
    }

    /** Parse URLs from Activity and route them to either provisioning or app-link flow */
    fun handleUrl(url: String) {
        if (url.startsWith(OID4VCI_CREDENTIAL_OFFER_URL_SCHEME)
            || url.startsWith(HAIP_URL_SCHEME)
        ) {
            val queryIndex = url.indexOf('?')
            if (queryIndex >= 0) {
                CoroutineScope(Dispatchers.Default).launch {
                    credentialOffers.send(url)
                }
            }
        } else if (url.startsWith(ProvisioningSupport.APP_LINK_BASE_URL)) {
            CoroutineScope(Dispatchers.Default).launch {
                provisioningSupport.processAppLinkInvocation(url)
            }
        }
    }
}
Refer to this URL handling code for the complete example.
- Wire the issuance loop and provisioning bottom sheet in
Content()composable:
Multipaz provides a built-in ProvisioningBottomSheet composable that handles the entire provisioning UI — no custom ProvisioningScreen is needed. The bottom sheet automatically displays provisioning progress, handles authorization redirects, and shows success/error states.
class App {
    @Composable
    fun Content() {
        // ...

        val provisioningState = provisioningModel.state.collectAsState().value

        LaunchedEffect(
            navController.currentDestination,
            provisioningState
        ) {

            // update the refresh hook with the credential issuance completion trigger
            val shouldRefresh =
                navController.currentDestination != null
                    || provisioningState is ProvisioningModel.CredentialsIssued

            if (shouldRefresh) {
                val currentDocuments = container.listDocuments()
                if (currentDocuments.size != documents.size) {
                    documents.clear()
                    documents.addAll(currentDocuments)
                }
            }
        }

        // Listen for credential offers and launch OID4VCI flow
        LaunchedEffect(true) {
            if (!provisioningModel.isActive) {
                while (true) {
                    val credentialOffer = credentialOffers.receive()
                    provisioningModel.launchOpenID4VCIProvisioning(
                        offerUri = credentialOffer,
                        clientPreferences = provisioningSupport.getOpenID4VCIClientPreferences(),
                        backend = provisioningSupport.getOpenID4VCIBackend()
                    )
                }
            }
        }

        MaterialTheme {
            Surface {
                NavHost {
                    composable<Destination.HomeDestination> {
                        /* HomeScreen() invocation*/
                    }
                }

                ProvisioningBottomSheet(
                    provisioningModel = provisioningModel,
                    clientPreferences = CompletableDeferred(provisioningSupport.getOpenID4VCIClientPreferences()),
                    backend = CompletableDeferred(provisioningSupport.getOpenID4VCIBackend()),
                    waitForRedirectLinkInvocation = { state ->
                        provisioningSupport.waitForAppLinkInvocation(state)
                    }
                )
            }
        }
    }
}
The ProvisioningBottomSheet composable is placed outside the NavHost — it overlays the current screen as a bottom sheet when provisioning is active, and dismisses automatically when complete. clientPreferences and backend are passed as kotlinx.coroutines.CompletableDeferred so the bottom sheet can suspend until the wallet back-end is ready.
Refer to this UI implementation code for the complete example.
- Implement
httpClientEngineFactoryinPlatform.kt
// core/src/commonMain/kotlin/.../core/Platform.kt
expect val httpClientEngineFactory: HttpClientEngineFactory<*>
See the commonMain/Platform.kt file for the complete implementation.
Android Implementation
// core/src/androidMain/kotlin/.../core/Platform.kt
actual val httpClientEngineFactory: HttpClientEngineFactory<*> by lazy {
    Android
}
See the androidMain/Platform.kt file for the complete implementation.
iOS Implementation
// core/src/iosMain/kotlin/.../core/Platform.kt
actual val httpClientEngineFactory: HttpClientEngineFactory<*> by lazy {
    Darwin
}
See the iosMain/Platform.kt file for the complete implementation.
- Add a button from
HomeScreento the Multipaz Issuer Website
@Composable
fun HomeScreen(
    // ...
) {

    val uriHandler = LocalUriHandler.current

    Column {
        // existing UI for presentment

        // button to redirect to the issuer
        Button(
            modifier = Modifier.padding(16.dp),
            onClick = {
                uriHandler.openUri("https://issuer.multipaz.org")
            }) {
            Text(
                buildAnnotatedString {
                    withStyle(style = SpanStyle(fontSize = 14.sp)) {
                        append("Issue an mDoc from the server")
                    }
                    withStyle(style = SpanStyle(fontSize = 12.sp)) {
                        append("\nhttps://issuer.multipaz.org")
                    }
                },
                textAlign = TextAlign.Center
            )
        }
    }
}
Refer to this code from HomeScreen.kt for the full implementation
ProvisioningSupport & OpenID4VCILocalBackend
The sample includes ProvisioningSupport (to imitate OpenID4VCI wallet back-end) and OpenID4VCILocalBackend (an in-app implementation of OpenID4VCIBackend).
OpenID4VCILocalBackend is used to sign:
- Client assertions (for token exchange)
- Wallet attestation JWT
- Key attestation JWT
ProvisioningSupport also coordinates the app-link redirect callback using a simple state→channel map.
Important: This is for development and testing only. Do not embed keys in production apps. In production, implement OpenID4VCIBackend on your server.
Highlights:
ProvisioningSupportmanages app-link OAuth callbacks using a state-channel, and an instance of `:waitForAppLinkInvocation(state)processAppLinkInvocation(url)getOpenID4VCIClientPreferences()getOpenID4VCIBackend()
class ProvisioningSupport(
    val storage: Storage,
    val secureArea: SecureArea,
) {
    companion object {
        // Custom URI Scheme used for app redirection in this sample.
        const val APP_LINK_SERVER = "get-started-app"
        const val APP_LINK_BASE_URL = "$APP_LINK_SERVER://landing/"

        // Alternative HTTP App Links (more secure)
        // const val APP_LINK_SERVER = "https://getstarted.multipaz.org"
        // const val APP_LINK_BASE_URL = "$APP_LINK_SERVER/landing/"
    }

    // Wait for wallet redirect: state is provided by the issuer during OAuth
    private val lock = Mutex()
    private val pendingLinksByState = mutableMapOf<String, SendChannel<String>>()

    // Instances of backend and client preferences used for provisioning
    private lateinit var backend: OpenID4VCIBackend
    private lateinit var preferences: OpenID4VCIClientPreferences

    suspend fun init() {
        this.backend = OpenID4VCILocalBackend()

        preferences = OpenID4VCIClientPreferences(
            clientId = withContext(RpcAuthClientSession()) {
                backend.getClientId()
            },
            redirectUrl = APP_LINK_BASE_URL,
            locales = listOf("en-US"),
            signingAlgorithms = listOf(Algorithm.ESP256, Algorithm.ESP384, Algorithm.ESP512)
        )
    }

    suspend fun processAppLinkInvocation(url: String) {
        val state = Url(url).parameters["state"] ?: ""
        lock.withLock {
            pendingLinksByState.remove(state)?.send(url)
        }
    }

    suspend fun waitForAppLinkInvocation(state: String): String {
        val channel = Channel<String>(Channel.RENDEZVOUS)
        lock.withLock { pendingLinksByState[state] = channel }
        return channel.receive()
    }

    fun getOpenID4VCIClientPreferences(): OpenID4VCIClientPreferences = preferences

    fun getOpenID4VCIBackend(): OpenID4VCIBackend = backend
}
You refer to the full ProvisioningSupport file here.
OpenID4VCILocalBackendimplements:createJwtClientAssertion(authorizationServerIdentifier: String): StringcreateJwtWalletAttestation(keyAttestation: KeyAttestation): StringcreateJwtKeyAttestation(credentialKeyAttestations: List<CredentialKeyAttestation>, challenge: String): String
class OpenID4VCILocalBackend : OpenID4VCIBackend {
    // Sign a JWT client assertion for token endpoint
    override suspend fun createJwtClientAssertion(authorizationServerIdentifier: String): String { /* loads JWK, signs JWT */ }

    // Sign wallet attestation JWT (draft-ietf-oauth-attestation-based-client-auth)
    override suspend fun createJwtWalletAttestation(keyAttestation: KeyAttestation): String { /* signs with attestation key */ }

    // Sign key attestation JWT covering ephemeral public keys
    override suspend fun createJwtKeyAttestation(
        credentialKeyAttestations: List<CredentialKeyAttestation>,
        challenge: String,
        userAuthentication: List<String>?,
        keyStorage: List<String>?
    ): String { /* signs with attestation key */ }

    companion object {
        /* hardcoded JWKs, keys, and client ID */
    }
}
You can copy-paste the OpenID4VCILocalBackend file for the complete implementation.
Wallet back end vs Issuer
- Wallet back end (OpenID4VCIBackend)
- Owned and operated by the Wallet App developer.
- Creates signed artifacts the issuer will trust:
- Client assertion (JWT) to authenticate to a token endpoint.
- Wallet attestation (JWT) binding the wallet to attested keys.
- Key attestation (JWT) for ephemeral public keys plus nonce.
- In this sample, it is mocked in-app for development. In production, implement this on your own server.
- Issuer (e.g.,
issuer.multipaz.org)- Operates OpenID4VCI endpoints: Authorization, Token, Credential Issuance, etc.
- Verifies the wallet back end’s signed artifacts and issues credentials to the wallet.
- You can refer to this document and this diagram for more info on the wallet backend
For local testing, the sample loads hardcoded keys (do not ship these in production; move to a backend). These are cached in-memory and used to produce compact JWTs with COSE-encoded signatures.
How issuance works (end-to-end)
- Scan or open a credential offer link like
openid-credential-offer://?credential_offer=... Appdetects credential offers and sends them toProvisioningModel.launchOpenID4VCIProvisioning(...)- The model requests a backend:
- Client assertion JWT
- Wallet attestation JWT
- Key attestation JWT
- User is redirected to the issuer’s authorization page in the browser
- Issuer redirects back to the app via
get-started-app://landing/?state=... ProvisioningSupportwakes the waiting challenge with the invoked redirect URL- The model requests and stores issued credentials in
DocumentStore - The UI lists issued documents
- A credential offer URL is received:
- As an OpenID4VCI link:
openid-credential-offer://?...
- As an OpenID4VCI link:
MainActivityreceives the VIEW intent and callsApp.handleUrl(url)- For credential offers,
Appenqueues the URL tocredentialOffers, which triggers:ProvisioningModel.launchOpenID4VCIProvisioning(...)with client preferences and back-end.
- For OAuth flows, the sample launches the system browser and waits for the app-link callback to the app; the URL is passed back into ProvisioningModel via
AuthorizationResponse.OAuth(...).- This will be an HTTPS app link of the form
https://apps.multipaz.org/landing/?...
- This will be an HTTPS app link of the form
- Once authorized, credentials are issued and stored in the DocumentStore.
Testing
- Use a credential offer from issuer.multipaz.org for any document
- Multipaz getting started sample app will get triggered
- The in-app provisioning screen will:
- Launch the browser for OAuth when needed.
- Upon selecting the appropriate user id (in our case for testing), you’ll get redirected again to the app again
- Wait for the app-link callback and continue.
- Display progress (Connected, Authorized, Requesting credentials, etc.).
- Launch the browser for OAuth when needed.
- After issuance, your credential appears in the app’s DocumentStore and is ready for presentment.
- You can see the new doc in the list of documents in the UI on the next app
Production Notes
- Keys and secrets
- Do not embed private keys in the client. Implement
OpenID4VCIBackendon your server. - Replace
CLIENT_IDand redirect URL with your own values. - Generate your own keys and attestation materials.
- Do not embed private keys in the client. Implement
- Use App links
- Host a Digital Asset Links file at
https://<your-domain>/.well-known/assetlinks.jsoncontaining your Android package name and signing cert SHA-256. - Add an Android
VIEWintent filter withandroid:autoVerify="true"for your HTTPS domain and path. - Example
assetlinks.jsonfile:
- Host a Digital Asset Links file at
[
  {
    "relation": ["delegate_permission/common.handle_all_urls"],
    "target": {
      "namespace": "android_app",
      "package_name": "org.multipaz.getstarted",
      "sha256_cert_fingerprints": [
        "AA:BB:CC:...:ZZ" // replace with your app's signing cert SHA-256
      ]
    }
  }
]
- Get the SHA-256 fingerprint using
keytool -list -v -keystore <path-to-keystore>
- Make sure your redirect URL matches your manifest filter, e.g.
https://getstarted.multipaz.org/landing/…consistently across:- Issuer configuration
- App’s
ProvisioningSupport.APP_LINK_BASE_URL - Manifest HTTPS intent filter
By following these steps, you’ve added OpenID4VCI-based credential issuance to the Multipaz Getting Started Sample, including URL handling, a minimal back-end for testing, and a simple authorization UI.